Step-by-Step Guide: How to Set Up and Configure SPF and DKIM Records
In the world of email deliverability, one of the key challenges faced by organizations is ensuring that their emails reach their intended recipients’ inboxes. One way to enhance email deliverability is by setting up and configuring SPF and DKIM records. In this step-by-step guide, we will explain what SPF and DKIM are, why they are important, and how to set them up effectively.
What is SPF?
SPF stands for Sender Policy Framework. It is an email authentication method that allows the recipient’s email server to verify that the incoming email is from an authorized source. SPF does this by checking the sender’s IP address against a list of authorized IP addresses listed in the domain’s DNS records.
Why is SPF important?
Email spoofing is a technique often used by spammers to send emails on behalf of someone else. By setting up SPF, you can prevent your domain from being used in email spoofing attacks. SPF helps protect your domain’s reputation and ensures that legitimate emails sent from your domain are delivered successfully.
How does SPF work?
When an email is received, the recipient’s email server checks the SPF record for the sender’s domain. The SPF record specifies which IP addresses or ranges are authorized to send emails on behalf of the domain. If the sending IP address matches one of the authorized addresses, the recipient’s server accepts the email as legitimate. If not, the email might be marked as spam or rejected outright.
What are DKIM records?
DKIM stands for DomainKeys Identified Mail. Like SPF, DKIM is an email authentication method. It adds a digital signature to each outgoing email, which can be verified by the recipient’s email server using the public key stored in the domain’s DNS records. This ensures the integrity of the email and confirms that it has not been modified during transmission.
Why are DKIM records important?
DKIM records are crucial for email deliverability because they help validate that the email is from the stated sender and has not been tampered with. By implementing DKIM, you can improve your email reputation and reduce the chances of your emails being flagged as spam or phishing attempts.
How do DKIM records work?
When an email is sent, the email server signs the outgoing message with the private key associated with the DKIM record. The recipient’s email server retrieves the public key from the DNS records and verifies the signature. If the signature is valid, the email is considered authentic and secure.
Now that we have covered the basics of SPF and DKIM, let’s dive into the step-by-step process of setting up and configuring these records.
Step 1: Understanding SPF and DKIM
Before setting up SPF and DKIM, it’s essential to understand the purpose and functioning of these authentication methods. Familiarize yourself with the concepts of SPF and DKIM, as described earlier in this guide.
Step 2: Setting up SPF records
Setting up SPF involves adding a TXT record to your domain’s DNS settings. Here’s a step-by-step process to set up your SPF record:
- Access your domain’s DNS management panel.
- Locate the DNS settings for your domain and select the option to add a new record.
- Choose the TXT record type.
- Enter your domain’s name (e.g., example.com) as the host value.
- In the TXT value field, enter the SPF record in the proper syntax. For example, “v=spf1 include:_spf.example.com ~all” includes a reference to the SPF record under the subdomain _spf.example.com.
- Save the changes to update the DNS records.
Note: The exact steps may vary depending on your DNS provider’s interface. Consult their documentation or support resources for specific instructions.
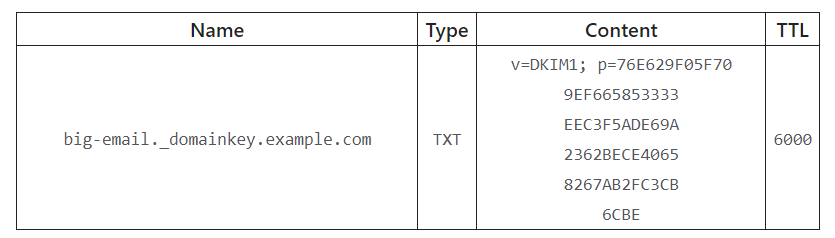
Step 3: Configuring DKIM records
Configuring DKIM involves creating a pair of cryptographic keys (private and public) and adding a TXT record to the DNS settings. Follow these steps to configure DKIM:
- Generate the DKIM key pair using a DKIM key generator tool or your email service provider’s DKIM setup guide.
- Once you have the keys, access your domain’s DNS management panel.
- Add a new TXT record.
- Enter the selector name (a unique identifier for the DKIM key) as the host value.
- In the TXT value field, enter the public key generated by the DKIM key pair.
- Save the changes to update the DNS records.
Again, the exact steps may vary depending on your DNS provider’s interface. Refer to their documentation for specific instructions.
Step 4: Testing SPF and DKIM configuration
After setting up SPF and DKIM, it is crucial to test the configuration to ensure everything is working correctly. Several online tools help verify the SPF and DKIM records for your domain. Use these tools to check if the records are correctly set up and if any issues need to be addressed.
By following these four steps, you can effectively set up and configure SPF and DKIM records for your domain. This helps improve email deliverability, protects your domain’s reputation, and ensures your legitimate emails reach the intended recipients’ inboxes.
Remember to periodically review and update your SPF and DKIM records to account for any changes in your email infrastructure.
Read
The Role and Benefits of SMTP Explained
Choosing the Perfect Premium Theme for WooCommerce Website
The Ultimate Guide to Choosing the Best Multipurpose Theme for Your Ecommerce Site